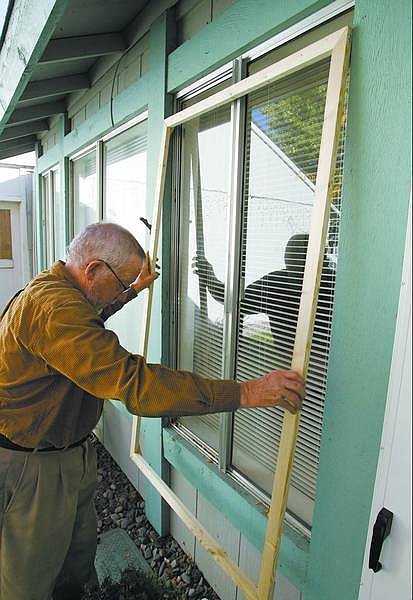
Cathleen Allison/Nevada Appeal Sam Bauman checks the size of a storm window at his home Thursday afternoon.
The cooler weather and the predicted jump in natural gas prices tends to make one think about how to better, and inexpensively heat the home. While most experts point to more attic insulation as the best way to hold down heating costs, there are also those older homes where aluminum windows from the 1970s are a big source of heat loss.
So what are the options?
First, homeowners can replace these old icebergs, at prices ranging from $130 to $300 for standard window sizes. In the long run, this is probably the best option. Actual installation is about $100 per window, but can vary widely. For this the house gets vinyl or wood windows which greatly reduce heat loss. Custom windows can, of course, literally go through the roof.
But what about just adding storm windows? They range in cost from about $80 to $120 per window.
Still a little pricey?
How about building storm windows yourself? Just buy some 1-by-2-inch pine stock, mortise them into the right sizes, with neat fits, staple thick (4 mm) clear plastic and stick them in the windows.
To give Nevada Appeal readers an idea of how much work is involved, your fearless microwave installer decided to build three such window covers. Here's my story:
- First, how had it been done in the past? Simple, find an old example. Did so and found that the frame was indeed 1-by-2-inch stock, white pine. With a window about 3-by-5 feet, that meant two lengths of 6-foot stock. Thick, clear plastic was stretched and folded over the back of the frame and stapled in place.
So with the sample on hand and several 8-foot lengths of pine, it was time to fish or cut frames. A 25-square-foot sheet of 4 millimeter clear plastic came in at $9.87.
- How about the mortises? Happily, an electric powered miter saw just happened to be sitting in the garage. This was a leftover from having attempted to mortise picture frames together, and having misshapen results.
This time it was measure at least twice before cutting once. Not only measure twice but take the first leg out to the window and make sure that it snuggled up nicely to the wooden outdoor window frame. Both width and height were carefully measured, tested for fit and then used as master models for another similar window.
- Assembly seemed tricky, so a patio picnic table was pressed into service for support. This is critical for matching legs in assembly. Checking with the old example frame showed that two screws had been used at each joint, along with a gusset (that's a small, flat triangle one fixes at each corner for strength). Considering the size of the wood, screw holes bored in the legs first seemed to be the answer.
One vertical leg was so attached to a horizontal, then checked for fit with the window frame. Things were looking up; the earlier measuring and fitting seemed to be paying off. The other two legs were joined and then added to the first two for a complete frame. And lo! it all fit.
However - and this is a big however - often window frames are not square. So while each leg fit just fine, when assembled into a rectangle, the lower right corner was about 1/16 of an inch narrower than the top of the window. Since the frame had been made on the assumption of being true, this caused major problems. The only way to make it fit was to disassemble the frame and shave off that 1/16 inch.
The moral of this is to be super careful in measuring and to not only make a measurement at one width, but several places along the wood framing.
- With a new frame flat on the picnic table on top of the plastic (which is on top of old newspapers, the Appeal, of course), it's time to close the frame.
But that's another story as it becomes tricky. Be here next week.
Tools and supplies needed:
• Pine stock 1-by-2 inches in whatever length required - length plus width (x 2) of each window.
• Screws to assemble mortise joints, two sizes. One for joints and one for gussets
• Screwdriver (electric)
• Screwdriver manual (handy for final tightening)
• Drill (electric with provisions for quick drill changes) and drill bits
• Electric miter saw (hand ones often result in jagged cuts)
• Heavy-duty stapler, staples
• Plywood sheet for gussets
• Roll of 4-millimeter clear plastic
Note:
Some readers of the Oct. 1 article on embedding a microwave in the wall between the kitchen and garage were alarmed about cutting a hole in the fire-resistant wall. They pointed out that such a hole filled with a plywood box ruined the fire protection that the drywall offered between the two parts of the house.
True, but we failed to mention that this was an old house, built under the code of that era that did not specify fireproofing between garage and house. So the box did not disrupt the integrity of the fire protection.
However, by the time this is printed, the box will be enclosed in sheet rock. Not fireproof, but to fireproof the garage would be a major undertaking. Readers should not cut holes in walls between living space and garages if the sheet rock is fire resistant unless the integrity of the fire wall is maintained.
- Contact reporter Sam Bauman at sbauman@nevadaappeal.com or 881-1236.

Comments
Use the comment form below to begin a discussion about this content.
Sign in to comment